Showing posts with label Pinterest. Show all posts

Saturday, September 14, 2013

Autumn Oak Leaves Pixie Hat - Made from Grandma's Sweaters

A couple of months ago, I spotted some cute pixie hats on Pinterest. I pinned this autumn oak leaves hat, which links to an Etsy sewing pattern that costs $6. The pattern is for two sizes: 9-18 months and 18-36 months.

The pattern doesn't really explain how much fabric you need. I went to Jo-Ann and ordered blindly! I got 1.5 yards of cotton fabric for the lining of the hat, and I ended up using about half of that for three hats. I ordered the smallest amount I could (1/8 yard) of felt for each of the three colors of felt I used. The fabric came to $8, and I had a lot left over. The most expensive item was the embroidery thread I bought for $8. I only got one color instead of two because it was expensive! I used that to stitch on the leaves and acorn. Finally, she lists "wool" as an item needed for the braids on the hat. I wasn't sure what I was supposed to get, so I just ended up using some straw-colored yarn I had. The main part of the hat was made from upcycled sweaters, so I ended up spending $16 on materials for 3 hats and $6 on the pattern.

A small hat for Hazel:
                                                                                             

A small hat for Paisley:

My mother-in-law, Colleen, gave me a few wool sweaters of hers, one that was her mom's when Colleen was a baby, and one that was her mother-in-law's. We worked hard to try to get the sweaters to felt. We put them in her laundry sink and added boiling water. We mashed them with a wooden spoon, and then we ran them through her dryer a couple times. They didn't felt! I tried at my parents' house because they have an older washer and dryer. She'd heard those work better for felting. It seemed to do the trick for some of the sweaters! Three of them felted, but two did not. I was able to get one hat from each of the three felted sweaters. Two of them shrunk so small that I could just barely get a small hat from each. One stayed large enough to get the larger size hat made for Jo. Oliver and Joanna have a new baby cousin, Paisley, so we decided she should get the small hat made from Great Grandma Jackie's sweater. I sent the other to my cousin for her little girl.

Here's Joanna in her autumn oak leaves pixie hat:

I think the hats are so stinking cute! I am not much of a seamstress at all, so I think anyone who has worked with a sewing pattern before would be able to make this hat. I hat a tough time with the first one, figuring out how to flip it and where to stitch in the braided pulls. After that, the others were easy!

Thursday, May 23, 2013

a SUMMER bucket list!

How perfect is it that this just popped up from Melissa & Doug on Pinterest? I just made my first bucket list earlier this week!

http://pinterest.com/pin/216383957069005328/

They recommend making a summer bucket list. Write down all of the things you want to do this summer!

I recommend not making it too long; after all, you want to be able to complete it over these next three months. I've created a summer bucket list for my family. It includes all of the things I want to do this summer, even if we've done them in the past.

* Watch a fireworks display on the Fourth of July.
* Bake a berry stars & stripes cake with Oliver.
* Run through the sprinklers.
* Go to a splash park.
* Play in the "creek" at the Children's Mordecai Gardens at the Denver Botanic Gardens.
* Watch our first parade.
* Ride the outdoor train at Belleview Park.
* Visit a petting zoo.
* Take the kids for a swim.
* Have a real outdoor picnic on the grass with a picnic basket.
* Watch a sunrise.
* Go for a hike in the mountains.
* Go on a road trip.
* Go out for an ice cream cone, and eat it outside!
* Make our own ice cream, and let Oliver choose the flavor.
* Pick and eat vegetables out of the garden we're growing at Grandma Judy's house.
* Eat cherry tomatoes right off the vine at Aunt Bonnie & Uncle George's house.
* Throw water balloons.
* Go tent camping overnight.
* Look at stars in the sky.
* Visit Andrew at work for lunch.
* Take the train downtown to visit Grandpa Larry for lunch.
* Go to the Fireman's Museum.
* Use sidewalk chalk.
* Blow bubbles.
* Take Father's Day photos with the letters that spell out "DAD" again.

Sunday, April 7, 2013

Home Improvement: The Kitchen Sink

Have you all seen the pin on Pinterest to put peel-and-stick tiles in your kitchen sink cabinet? It looked like a super cheap and easy home improvement idea, so I pinned it and finally got around to doing it one night last week.

The project cost under $15, and it took me about 2 hours from start to finish.

Here's the "before" photo. Yuck, huh?!


And here are the after photos:

I feel like I got a lot of bang for my buck! The only problem I encountered with the project was the tiles I ordered had arrows on the backing paper. I made sure all of the arrows pointed in the same direction. I realized when I was halfway through the project that the arrows didn't point in the same direction on all the tiles, so some are upside down. It kind of made me mad, but then I decided it doesn't matter that much, and it definitely looks very much improved!

I realized I never posted about my cabinets, either. A couple Christmases ago, Andrew's uncle gave me a gift card to Bed, Bath, and Beyond. I ordered a bunch of cabinet pulls because our cabinets looked very outdated. I took off all of the cabinet pulls, cleaned the cabinets, polished them with wood polish, and then screwed in the new handles. The project would have cost about $100, but it only cost me the wood polish!

Here are the before and after shots of the cabinets:

Close-up:

I really love it when simple changes make a big difference.

Friday, April 5, 2013

Birdseed Biscuits


Spring has sprung in Denver, and we need some activities to get us out of the house!

At the grocery store today, I passed by a display of bird seed. Years ago, when I was pregnant with Oliver, I flipped through a Parenting magazine at my OB-GYN's office. I saw an article on how to make a cute, little, heart-shaped birdseed biscuit. I tore it out and saved it in my recipe box. When I started on Pinterest over a year ago, I went through a bunch of things I'd saved, pinned them, and then tossed out the random articles and how-to's that I'd saved. Let Pinterest save them for me! So, anyway, I found the birdseed biscuit online and pinned it here. When I saw the birdseed at the grocery store, it reminded me of the project. I decided Oliver is finally old enough! I picked up a 7-pound, reclosable bag of wild bird feed for $6. Warning to parents of kids with severe allergies: the bag of bird feed I picked up said it contains peanuts.


When we got home, I asked Oliver if he wanted to help me make some food for the birds. You guys, he got so excited!

Here's what you need to make your own bird seed biscuits:

*Bird seed (approximately 1 cup)
*Flour (approximately 2 Tablespoons)
*Water (as needed, but approximately 2-4 Tablespoons)
*Cookie Cutter (Or use a cup to cut out circles)
*A straw
*Ribbon or string

Here's how we made our biscuits:

I handed Oliver a 1/4 cup measuring cup and asked him to pour 5 scoops of the bird feed into a bowl. Not all of his scoops were full scoops, so we probably ended up with about a cup of bird seed in the mixing bowl. I asked him to add one small scoop of flour. He filled up the same measuring cup about halfway with flour and dumped it in, so we had about 2 Tablespoons of flour to our mix. This isn't an exact science, so go with it! I filled a small pitcher with just a splash of water. Oliver poured it in and mixed everything together. It looked a little dry, so I got a bit more water. The water and flour basically make a paste to hold the birdseed together.


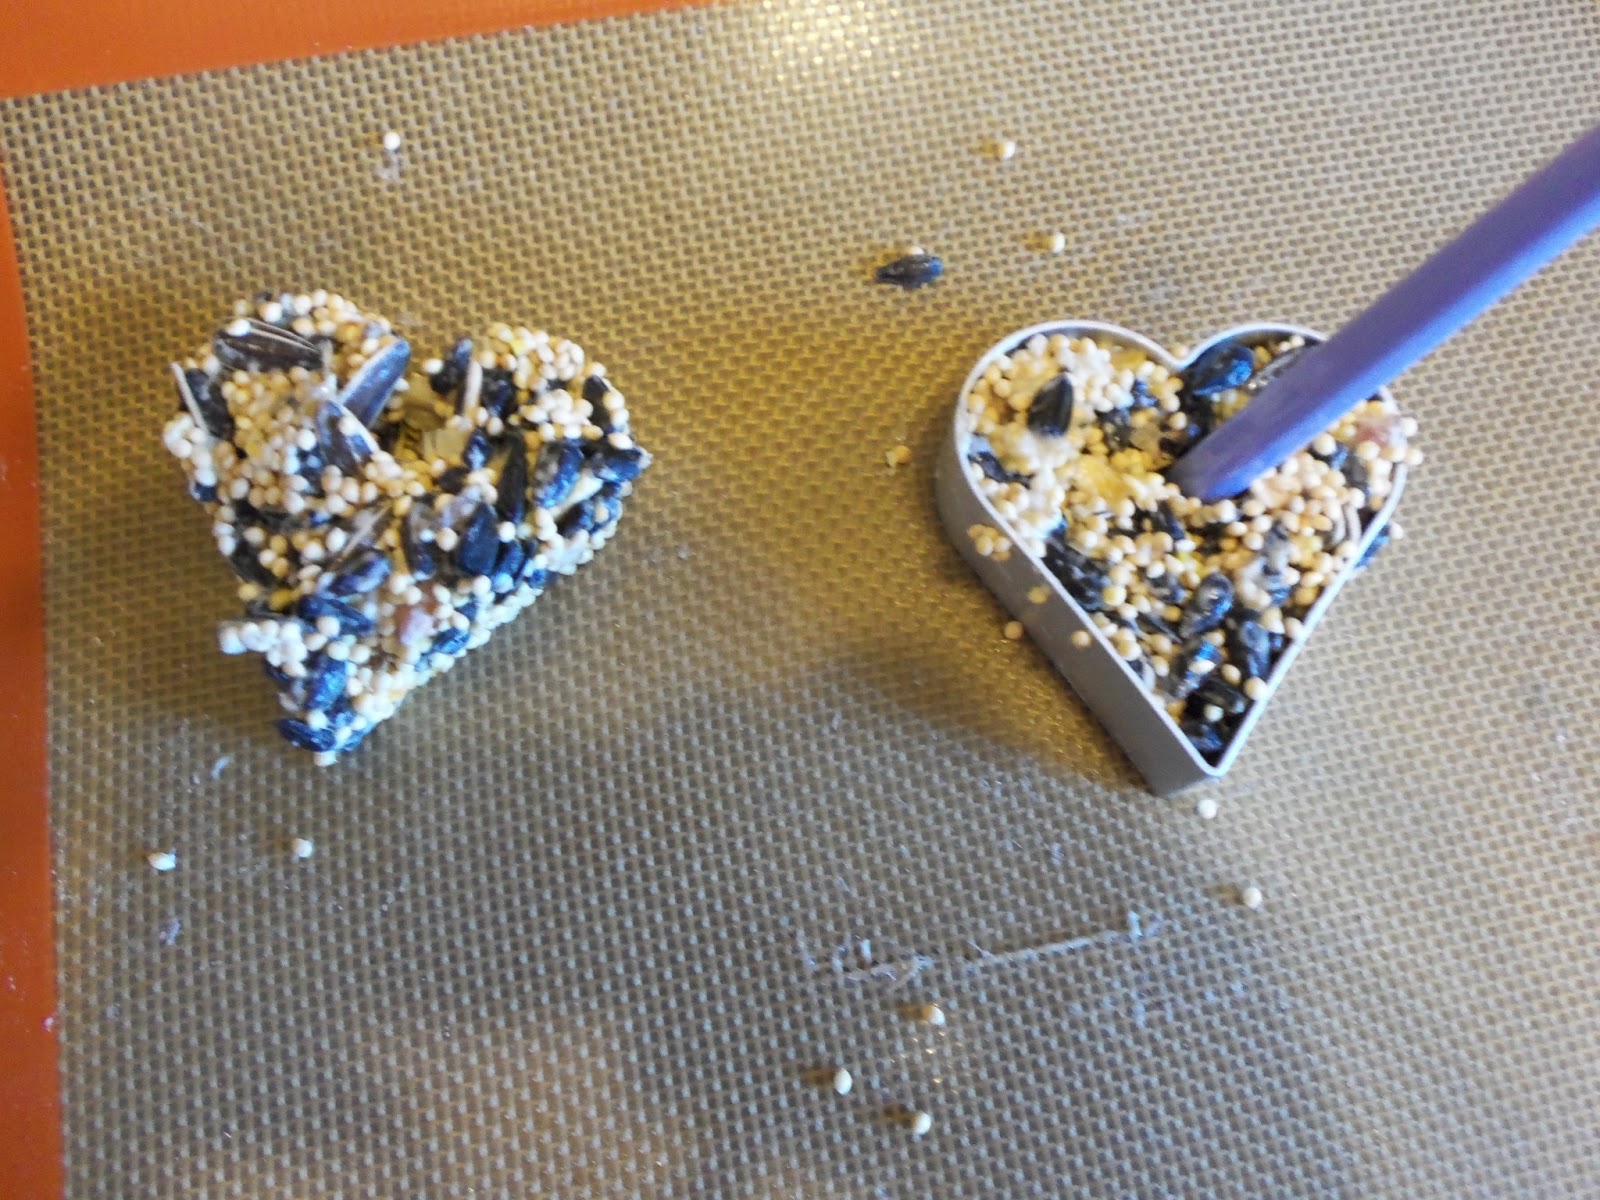
While he mixed, I preheated the oven to 170 degrees F. I sprayed my cookie cutter with Pam. I lined a baking sheet with a silicone liner I have, but you can just put foil or parchment paper on your baking sheet. When Oliver was done mixing, I pressed the mixture into the cookie cutter. I poked a hole with a straw-like instrument I had on hand. Make sure the hole goes all the way through to the bottom of the biscuit, so you can string a ribbon through when they're done baking. The directions I read said to leave the straw in while it bakes, but I actually pulled mine out. It wasn't a problem for us. I gently lifted the cookie cutter away from the biscuit and then got to work on the rest. We got 6 small biscuits out of our mixture. I popped the biscuits in the oven for an hour for them to dry and set.


As they were baking, I put Jo to bed for nap time. As I tucked Oliver in for his quiet time, he looked up at me and said, "OK, so after quiet time, we can go outside and give the birds the food." He is so excited! That made me really happy. The biscuits finished up as they rested, so I finished the project by threading ribbon through the hole in each biscuit, and I tied it with a bow.

As soon as Jo was up, Oliver announced, "OK! We get to go outside and give the birds their food!" He hung each biscuit from the tree. Then, we sat on the porch and blew bubbles, watching for the birds to come.


The birds didn't come. When we ran out of bubbles, I told Oliver we were probably scaring the birds away. So, we went inside, and he watched from the back door.


Finally, a little critter came and ate two of the biscuits. No, it wasn't a bird. It was a squirrel! I captured this photo of the guilty party:

Monday, March 11, 2013

A Baby Shower to Remember


We did it! Even with all the snow, the roads stayed clear, and the baby shower was a go! All those weeks of planning were worth it, as Aminta and I pulled off a wonderful shower to celebrate Phuong & Cactus's baby.

Aminta was in charge of the decorations and totally made everything look cute.


Here is our table display:

I love how my storks looked on the table! You can find the stork tutorial here.


One of the most hilarious mishaps was the fruit salad I made, which people dubbed the "alien baby." I'd found it on Pinterest (you can find that pin here). But, here's the thing: I don't like most melons. I've never bought a honeydew melon before nor a cantaloupe. In my mind, they were the same thing: melons that don't taste good. Ha! So, I bought a honeydew thinking it was a cantaloupe. The morning of the shower, I went to peel back the melon skin only to discover it was green! Oops. So here is the now infamous alien baby fruit salad:

I think my baby bump cake ended up looking cute! I joked that I should have tucked a plastic baby into the tummy, kind of like people do for King Cakes at Mardi Gras. You can see how I made this cake by clicking here.

Deviled eggs are some of my favorite treats. I scoured the internet looking for ways to make them cute for a baby shower. I ended up finding a pin on how to make hot dog babies in the deviled eggs. I don't eat meat, and, frankly, I wasn't sure how good deviled eggs would be with hot dogs on them anyway. So, I just made a few into babies and left the rest plain.


Aren't those little duckies cute? I bought a package of them to decorate the punch I made! I got the rubber duckie idea from Pinterest, but I didn't want to use the punch recipe. I based my recipe off of one from Allrecipes.com. I used two frozen pink lemonade concentrate cans, one two-liter bottle of club soda, and four bottles of sparkling apple juice. To make it foam, I scooped a couple pints of berry sherbet on top. It tasted like sparkling strawberry lemonade! I was so amazed at how delicious and cute the punch ended up! I used another tip from Pinterest and froze slices of lemon in water in a cupcake tray.


Aminta made these cucumber sandwiches that were soooo good. Seriously, I think I ate half of them. She added some herbs and spices to cream cheese, spread it over rye bread, and topped it with fresh cucumbers. Not pictured are some miniature cherry danishes she brought in addition to a beautiful vegetable tray with dip and hummus.


We hung the diaper wreath near the entrance. It got a lot of compliments! Everyone made me feel so appreciated for everything. In case you missed the tutorial on this diaper wreath, you can find it here.


Aminta made these cute "lollipops" for Phuong out of washcloths and baby spoons. She poked them into a sand pail & shovel and filled it with Easter grass. It almost looks like flowers blooming! That idea also came from Pinterest, and there's a tutorial with that pin.


This is the start of the gift pile. Pictured are the "lollipops" by Aminta, the diaper tricycle that I made, the blanket I made, and the giraffe I made. 


Aiiiee! They are so cute! Seriously, Phuong and Cactus are two of the sweetest people in the world, and they are going to make the best parents. They loved the giraffe and tricycle diaper cake, making all of my hard work absolutely worth it.


Here's a close-up of the blanket. The pattern for this blanket is free, so if you like to crochet, you can find it through this pin.


More decorations from Aminta!


The balloons were loved and coveted by all the children.


Here are my best friends and me, ready to get the party started!


Phuong greeted all of her guests at the door. There were new friends and old friends and friends she hadn't seen a few years. We all had one thing in common... we all wanted to create a special day to shower our dear friend with gifts for her baby!


Oh.my.gosh! This is me with my friends from high school! It's been more than a decade, but we agreed that all of us looked exactly the same. 


We had favors for our guests, of course! I'd originally planned on making these fortune cookie favors (and did), but they weren't big enough to hold candy!


So, a couple days before the shower, I was really feeling the time crunch. My supportive husband helped me cut out a couple dozen paper shoes, which I then filled with the candy that was supposed to have filled the fortune cookies. You can find the paper shoe pattern on the Michael's website, or on the description of this Pinterest pin.


I found this poem online.


For games, we had people guess the width of Phuong's belly. We also had everyone fold a paper crane to string up on a mobile for the baby. Actually, folding paper cranes was a lot harder than I expected! I'm glad a couple people there knew what they were doing and were able to help everyone else out.

Here's Jennifer helping me with my crane:
I was able to string up all of the paper cranes while Phuong opened her gifts. The cranes have a gap in the bottom, and I couldn't figure out how to string them. The knotted thread wasn't thick enough to hold up the crane. Sayaka advised me to cut out circles. Using a needle, I thread the string first through a crane, then through a circle, and then I made a knot under the circles. It worked like a charm! You can get the how-to for this paper crane mobile from my Pinterest pin.

Here's our finished mobile:


Everything was perfect. The food, the company, the decorations, the happy couple... It was wonderful! I couldn't have done it without Aminta. Aminta kept everything moving smoothly. She made sure gifts were opened when they should be opened, she had people fill out their addresses on thank-you cards, she wrote down who gave what gift. She was so organized and on-top of everything! I might have had fun decorating the shower and preparing the food, but things would have been stagnant without Aminta's expertise. Thanks, Aminta!

And here are a few random shots from the shower: