Showing posts with label Toddler. Show all posts

Saturday, September 7, 2013

100 (Attempted) Ways to Entertain a Young Toddler, Day 95: Toddler Spray Paint

Don't forget that the monster hat giveaway ends later today (9/7/13)!

I decided to take the kids outside to try to recreate an activity I found from kiwicrate.com. She had her little boy spray large sheets of paper with a spray bottle that she filled with water and Koolaid. We don't have Koolaid, but we have food dye. My husband cleaned out a spray bottle for us to use, and we filled it with water and red food coloring. It reminded me a lot of the time I took Oliver out to spray the snow in the winter. That activity didn't go very well because he wasn't interested in spraying the snow. I wondered how painting paper would be.

We didn't have large butcher paper on hand, so we used computer paper, which I weighed down with some pine cones. Joanna wanted to play with the pine cones.


Oliver did a really great job spraying and enjoyed the activity. Jo was interested but couldn't spray by herself. She tried really hard, though. Oh, and that is a name tag on Oliver because we tried to attend a nature class up at Lookout Mountain today. It didn't go very well, but he liked the name tag!

Oliver kept spraying and spraying! I turned over the sheets so he could spray them again. We switched colors from red to orange because he wanted more colors.

He was interested in trying to spray the pine cones.

Joanna wanted to spray the pine cones, too, but she couldn't get the spray bottle to work.

From my experience with the kids, this is a really fun activity for kids who aren't toddlers. I could see Oliver having a really good time if I gave him lots of bottles filled with different colors. Joanna thought the whole thing looked fun, but she couldn't really do it herself. Although the website recommended this activity for kids 2+, I think it's better for 3+ or 4+. As a toddler activity, I give it a D+. The "plus" is because Jo was interested and was kept busy with trying to work the spray bottle.

Pros: Easy to set up, good for hot days, outdoors.

Cons: Can stain, difficult for toddlers, doesn't last long (unless you have a lot of paper to use, I suppose!)

Monday, July 15, 2013

100 (Attempted) Ways to Entertain a Young Toddler, Day 93: Cardboard Boxes

Today's activity is a classic! Colleen, my mother-in-law whom we're staying with for a few months, took a couple of cardboard boxes and taped them together to create a tunnel for the kids. At first, they were a little skeptical, but it didn't take long for them to get really into it. I loved that they were playing together!


I took a video of all the fun they had playing with this box tunnel. Warning: it's about two minutes of the kids squealing! They really enjoyed themselves.
                                           

We were fortunate enough to have these boxes around (thanks to Colleen!), but you can usually buy large boxes from a place like U-Haul or a storage center for about $2 a piece. I think this is a great activity to keep in mind for a rainy day or for when winter rolls around. It was a hit with both of my kids, which means it's not just a toddler activity! I give this activity an A.

Monday, June 10, 2013

100 (Attempted) Ways to Entertain a Young Toddler, Day 92: Toddler Fan Ball

Andrew invented a new game that the kids love. He set up a box fan in my parents' living room and set it on high speed (be careful of little fingers!). Oliver would drop some light-weight balls in front of the fan, and then the kids would watch them blow around the room! There's a video of the activity down at the bottom of this post to show how the game works.

It sounds odd, probably because it is. They both got a real kick out of it, though, and Jo ran after the balls and fetched them over and over again. They had the best time!

Here's Oliver setting the ball in front of the box fan:

And there goes Jo, chasing after it!

Happiest and proudest toddler ever?

Chasing after the balls is so much fun! I feel like we're playing fetch with the kids, only without having to do anything.

This next photo is unrelated but cracks me up. We brought out a taller fan for the kids to check out. Oliver covered his ears in case it was noisy. After studying him for a bit, Jo decided to cover her ears, too. You know, just in case!

Here's a video to show how this game works:
                                                         

I give "Toddler Fan Ball" a grade A! It's easy to set up, takes minimal effort, leaves no mess, and gives the kids a way to run out their energy! Possible cons deal with safety: tripping over fan cords or reaching into the fan. I hope your toddler loves this as much as mine does!

Wednesday, March 27, 2013

Volcano Easter Eggs!


We took the kids over to my in-law's house today to dye some Easter eggs. Colleen asked me if I'd seen the pin she'd found on Pinterest (I hadn't). It was for volcano Easter eggs, and she wanted to give it a try. You can find the pin right here, and it will direct you to a fun blog called "Toddler Approved." Check it out!

The basic idea behind the activity is this: You paint your Easter eggs using a baking soda and food coloring mixture. Then, you drizzle the egg with vinegar. It foams and dyes the egg!


It reminds me a lot of the vinegar and baking soda color explosion activity we've done (many times now) in the past. This one doesn't have quite as sensational of an explosion, but it's absolutely a new and fun way to dye those eggs!

To make the paint, I eyeballed about a Tablespoon of baking soda. I added 6 drops of food coloring, and then I added just splash of water. That was enough to thin it out enough to paint.

Here are the kids painting their eggs with Grandma Colleen:

Once your egg is painted, set it in a bowl or other container (something you don't love dearly, in case it stains) and drizzle some vinegar on it. It foams! Oliver was in awe and said, "Wow, Grammi, wow!"

Here's a video of our kids making volcano Easter eggs:
                       

Monday, March 25, 2013

100 (Attempted) Ways to Entertain a Young Toddler, Day 91: Pushing Pom-Poms


Today's activity comes from the Fun & Engaging Activities for Toddlers blog. She found it from another blog, so it's been passed down a few times. I decided I would try it and see what the kids thought.

What you need to make this toy:

* An empty & clean plastic container. She used a margarine container, and I used a yogurt container.
* A knife
* Scissors
* Permanent marker (various colors are optional)
* pompoms (available at your local craft store)


After cleaning and drying my yogurt container, I used a sharp knife to carefully poke holes into the lid. I worried the edges were sharp, so I used scissors to round out the holes as best I could. The holes were almost impossible to see on the clear lid I used, so I used a Sharpie to outline the holes. If your kid is older, you might outline holes with different colors. Your child can then put the yellow pompoms into the yellow hole, the green pompoms into the green hole, etc.

Once your toy is made, just give your kid pompoms and let them poke them into the lid!


Joanna loved this activity! She picked it up right away and enjoyed poking pompoms into the lid over and over. I think her excitement was contagious because Oliver wanted to play, too. We only had four pompoms (I can't find where I put the rest of them), so Oliver would take the lid off the container, dump it out, and separate the pompoms so they each got two. He put the lid back on, and then they'd push their pompoms through again.

I wasn't expecting this toy and game to be as fun as it was. They loved it and played for about 20 minutes.


We've played a different version of this game in the past. I keep an empty travel wipes container, and Jo enjoys dropping letters into it (like a mailbox). Pushing pompoms into the holes was a bigger hit.

Pros: Easy to make, simple, cheap, fun, keeps kids busy
Cons: Need supplies, possibly sharp

This took all of 5 minutes for me to make. The container is its own storage, so it's easy to tuck away for a rainy day. It kept both my kids (3 years, 4 months old and 16 months old) happily occupied. I'm thrilled! This is something I plan on keeping and pulling out whenever we can't leave the house for illness or weather. It gets an A.

Tuesday, March 5, 2013

100 (Attempted) Ways to Entertain a Young Toddler, Day 90: Stacking Blocks


I get a few monthly updates in my inbox that tell me what stage my kids are in, what parenting difficulties I might face this month, and what activities might be good for their development. I'm actually not even sure how I got subscribed to these emails, and I don't always read them. I think I get one from Pampers and one from some sort of "baby center" or something. Well, anyway, I recently read that Joanna is at a good age to enjoy stacking blocks. She received some large, stacking/nesting blocks for Christmas. At the time, she wasn't very interested in them. At almost-16-months, she's supposed to be interested in them now (according to my email...). So, I decided to test it as a young toddler activity.

I demonstrated to Jo how the blocks stacked. She took to it immediately! Our blocks are various sizes, and she didn't grasp the concept that smaller blocks should be stacked on larger ones. That must be a later development stage. She was positively thrilled to stack them up however she could, only to knock them down immediately and squeal with glee!

Here are some photos of Joanna testing out our "Stacking Blocks" activity:


This activity wasn't just fun; it was a hit. We tested it out yesterday morning, and she keeps begging to play again and again. When she isn't stacking blocks, she can be found pointing to the computer, pleading with me to play the videos of her stacking her blocks.
                                                         

Pros: Simple, Educational (gets them thinking), Fun, No Mess
Cons: Blocks costs money

I couldn't find these exact blocks to link for you, but I did find some Melissa & Doug Nesting & Stacking Blocks that are very similar:
                                                                                                  

Because of the upfront cost involved (and, thus, planning), I give "Stacking Blocks" an A-.

Friday, January 25, 2013

100 (Attempted) Ways to Entertain a Young Toddler, Day 89: Toddler Ball Pit


I found this pin from Rookie Moms on Pinterest months ago and then forgot about it. Then, today, I took the kids to Target to shop for presents for two birthday parties we're attending this weekend. Large bags of play balls were on clearance for $7.50! They were on an end-cap in the toy section at my local Target. I picked up a bag for us and a bag for our friend turning 1.


As soon as we made it in the door, the kids started begging to play.

I set up the play yard and dumped all 150 balls in there. As an FYI, this ended up being enough for the kids, but I'd imagine you could easily add a second bag unless your kid is really little.

At first, Jo hated the toddler ball pit. I set her inside, and she started crying and stood up for me to pull her out.

Oliver had a great time throwing balls and rolling on them and kicking them!

After nap time, we tried again. First, Jo watched Oliver play. When she seemed comfortable, I stuck her back into the ball pit. Success!

Jo banged balls together, kicked at them, and squealed with joy!

I grabbed a mixing bowl and pitcher and handed them to the kids. They filled them up and poured the balls back out. Oliver even filled the bowl according to color.

This activity was a major success! I have a feeling our ball pit is going to stay set up all weekend.

Pros: Easy to set up, no mess, and tons of fun!

Cons: Possible injury (especially if you have two kids in the pit) and it costs money to do

I give this activity an A-

Here's a video of their toddler ball pit fun:
                               

Tuesday, January 8, 2013

100 (Attempted) Ways to Entertain a Young Toddler, Day 88: Play Foam


Today's activity came from a blog called 
"Play, Create, and Explore." The mom mixed two boxes of corn starch and one container of shaving cream. It produced a large amount of "Fluffy Stuff" for her kids to play with. The made balls out of it for summer "snowballs," and, when her son threw them, they would explode in a powdery poof. 


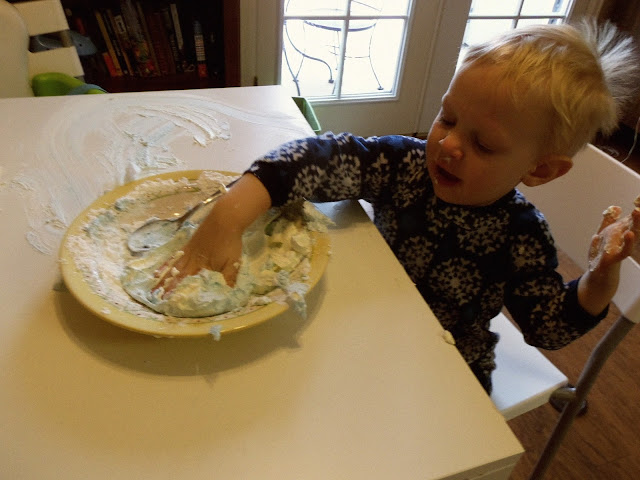
That sounds like so much fun; doesn't it? With it being winter, it's not exactly prime time to play outside, and I didn't want clouds of fluffy stuff exploding in my home. So, I decided to do her project but made it much wetter (I used less cornstarch). The result was a fun foam that could be molded into towers. It reminded me of some of the images I've seen on Pinterest of "moon sand" (sand, corn starch, and water) and "cloud dough" (flour and baby oil). It also reminds me of the non-Newtonian fluid science activity we did a few months ago.

I didn't need to make much. This is how much shaving cream, corn starch, and food coloring I used. If you use food coloring, be careful because it could stain.

At first, Oliver wanted to eat it. I told him no, and he started to cry. Jo saw him crying and decided to join in. She also seemed to be afraid of our play foam. She wouldn't touch it.

After a few minutes (when I told them I was just going to clean it up), Oliver finally decided to start playing with the foam. He loved smashing it!

What's this?

Then, he discovered he could mold it:

It felt really soft and squishy. I kept squishing some, too.


Clean up wasn't too bad. I plopped the kids in the tub. After they were clean, we went back to the kitchen and cleaned the table. The foam had dried and left behind powder. I just had to wipe, and off it went! We didn't have a problem with staining on our table, but I probably should have tested it first to be safe.

I'm not sure what to grade this activity. Oliver loved it, but Joanna hated it. Later, during clean up, she accidentally got some on her finger and freaked out. That's not her personality at all! I'm going to give it a B- because it was really easy to set up and clean and made for nearly an hour of fun for Oliver. Even if your child hates it as much as Jo (unlikely), at least you didn't waste much time or resources. Our version was really good for an indoor activity, but I really look forward to this summer when we can make a big batch and form summer snowballs!