Showing posts with label child activities. Show all posts

Tuesday, October 15, 2013

Preschool Kids' Craft: Easy Fall Wreath


Twice recently, I've taken Jo to MOMS Club, and she's gotten to play with foam stickers. She has had the best time with them! Just yesterday, we were at a mom's house, and Jo stuck a bunch onto a paper plate. It gave me an idea...

I went out to Michael's and found a bucket of those stickers. They were $7.99 but on sale for 40% off for Columbus Day. They usually have 40% off coupons on their website. I also picked up a glue stick and some paper plates from the grocery store. Then, I took & printed some photos of the kids. I cut them down to the size of the center of our paper plates.

Here are our supplies:
Jo quickly jumped into the project and stuck leaves all over the center--not exactly a wreath. I wanted her to have fun, though, so I lightly glued some parchment paper on the center of the plates. I figured I could just peel off the parchment paper at the end to get any excess stickers off the center. Turns out, that step ended up being unnecessary for Oliver. He was very eager to do the project "right" and stuck all the stickers around the edge of his plate.


He really loved this project!

Here's Oliver with his finished wreath. He even glued the back of the picture himself using a glue stick.


Joanna discovered it was better to put the stickers on herself and the table. She decided putting stickers on the plate just wasn't cutting it anymore.


It looks like she's putting more stickers on the plate. Nope! She's pulling them off.

So, Oliver got busy making an extra wreath frame for Jo!

I stuck magnets on the back and wrote their names and ages on the front. Everything else was done by Oliver! Afterwards, he begged to make more, so we are about to get busy making one more. This was so cute and simple, and it's a huge hit! I have tons of stickers leftover, though, including some turkey stickers, so we're going to have to figure out what to do with all of them.

Saturday, September 7, 2013

100 (Attempted) Ways to Entertain a Young Toddler, Day 95: Toddler Spray Paint

Don't forget that the monster hat giveaway ends later today (9/7/13)!

I decided to take the kids outside to try to recreate an activity I found from kiwicrate.com. She had her little boy spray large sheets of paper with a spray bottle that she filled with water and Koolaid. We don't have Koolaid, but we have food dye. My husband cleaned out a spray bottle for us to use, and we filled it with water and red food coloring. It reminded me a lot of the time I took Oliver out to spray the snow in the winter. That activity didn't go very well because he wasn't interested in spraying the snow. I wondered how painting paper would be.

We didn't have large butcher paper on hand, so we used computer paper, which I weighed down with some pine cones. Joanna wanted to play with the pine cones.


Oliver did a really great job spraying and enjoyed the activity. Jo was interested but couldn't spray by herself. She tried really hard, though. Oh, and that is a name tag on Oliver because we tried to attend a nature class up at Lookout Mountain today. It didn't go very well, but he liked the name tag!

Oliver kept spraying and spraying! I turned over the sheets so he could spray them again. We switched colors from red to orange because he wanted more colors.

He was interested in trying to spray the pine cones.

Joanna wanted to spray the pine cones, too, but she couldn't get the spray bottle to work.

From my experience with the kids, this is a really fun activity for kids who aren't toddlers. I could see Oliver having a really good time if I gave him lots of bottles filled with different colors. Joanna thought the whole thing looked fun, but she couldn't really do it herself. Although the website recommended this activity for kids 2+, I think it's better for 3+ or 4+. As a toddler activity, I give it a D+. The "plus" is because Jo was interested and was kept busy with trying to work the spray bottle.

Pros: Easy to set up, good for hot days, outdoors.

Cons: Can stain, difficult for toddlers, doesn't last long (unless you have a lot of paper to use, I suppose!)

Monday, July 22, 2013

Preschool Science Projects


We have performed a number of science projects that are just perfect for curious little kids! Try these out for yourself, or give them a read to get your creative juices flowing. Please let me know how they work for you, and share any kid-friendly experiments that your little ones love!

Super Simple Experiments:

Vinegar and Baking Soda Experiments:

Messy Play (and Learn!):
  • Non-Newtonian Fluid. A simple mixture of cornstarch and water doesn't act like a typical liquid. You have to try this for yourself!

Sunday, July 21, 2013

Preschool Science: Melt Ice Cubes

The other day, Oliver and I decided to do a last minute science project. He loves the ice dispenser in his grandma & grandpa's fridge, and I tried to tell him that ice is just frozen water. So, we decided to experiment!

Please be aware that microwaves can create hot pockets in liquid. So, if you do this project with your preschooler, you will want to make sure you check the temperature and stir the ice water to prevent those really hot pockets from forming!

Step 1: Oliver got ice from the ice dispenser. So fun! We used crushed ice because it would melt faster (more surface area). 


Step 2: Oliver put the cup of ice in the microwave. He heated his ice for 30 seconds, and then he stirred it. There was already some water in the cup after 30 seconds!

We microwaved the ice three times at 30 seconds. After the third round, all of the ice melted.

Step 3: Drink!

Oliver was really excited that he "made" water. I considered refreezing it to show him how water can go back from liquid to solid. Ultimately, I decided he wouldn't have enough patience to wait for water to freeze, so we didn't perform that experiment.

For dinner, we boiled water for rice. Oliver likes to watch, and I pointed out the steam to him. I explained how the steam is water, too. It can be solid, liquid, or gas, depending on the temperature! I think he mostly just thought it was neat to use the ice dispenser and microwave, but he also seemed to grasp the concept that water gets solid and turns to ice when it's really cold.

I love preschool science!

Monday, June 10, 2013

100 (Attempted) Ways to Entertain a Young Toddler, Day 92: Toddler Fan Ball

Andrew invented a new game that the kids love. He set up a box fan in my parents' living room and set it on high speed (be careful of little fingers!). Oliver would drop some light-weight balls in front of the fan, and then the kids would watch them blow around the room! There's a video of the activity down at the bottom of this post to show how the game works.

It sounds odd, probably because it is. They both got a real kick out of it, though, and Jo ran after the balls and fetched them over and over again. They had the best time!

Here's Oliver setting the ball in front of the box fan:

And there goes Jo, chasing after it!

Happiest and proudest toddler ever?

Chasing after the balls is so much fun! I feel like we're playing fetch with the kids, only without having to do anything.

This next photo is unrelated but cracks me up. We brought out a taller fan for the kids to check out. Oliver covered his ears in case it was noisy. After studying him for a bit, Jo decided to cover her ears, too. You know, just in case!

Here's a video to show how this game works:
                                                         

I give "Toddler Fan Ball" a grade A! It's easy to set up, takes minimal effort, leaves no mess, and gives the kids a way to run out their energy! Possible cons deal with safety: tripping over fan cords or reaching into the fan. I hope your toddler loves this as much as mine does!

Friday, May 10, 2013

Rainy Day Painting!

I discovered this fun idea from Pinterest: http://pinterest.com/pin/216383957068769139/
It comes from the Little Page Turners blog.

I've been waiting for a rainy day to give the project a chance because it looks promising. Today, once the hail stopped, I jumped on the chance to get outside to "paint." It was going to be a toddler activity until the last minute when I realized Jo is too little to do drops of food coloring.

Oliver was very excited to do the drops. I have all of our craft supplies packed up, so I improvised and used sandpaper instead of card stock. Oliver made a few drops of yellow and blue on the sandpaper.


He was a little reluctant to go outside, so he held his out to catch the rain drops. It wasn't really getting wet, so I coaxed him outside to lay it down on the porch (It's cluttered out there because we're cleaning out the storage shed! The worst of the mess isn't even in the photo...).

A few drops hit the paper, and then the rain stopped.

It was too slow of a transformation to keep Oliver interested. He definitely wanted to do more drops, though. He went outside and added a little red. We didn't get any more rain, but the colors slowly leaked from the paper getting a little damp.


I guess we had the opposite problem from Little Page Turners. She said their paintings only took 1-2 seconds to run together. She wished it had been longer! Here in the dry West, I guess it takes more like 20 minutes. Ha!

It didn't end up being the fun activity I'd hoped for, but I want to try it again one day. We usually get a week of good rain at the end of July, so we'll attempt this activity again then!

Sunday, April 21, 2013

Birdhouses for 54 Cents!

Last week, I found some little, wooden birdhouses at Joann Fabrics. They were $1.09, but they had 50% off coupons online and on their flyer in the store. So, I snagged a birdhouse for 54 cents! We were so busy last week, but we finally found time on Thursday to paint. Oliver usually isn't very interested in art, but he really got into painting the birdhouse.


Oliver was really proud of his birdhouse and kept asking to "show Dad!" We let it dry overnight, and then I filled it with some birdseed that I had leftover from the birdseed biscuits we'd made.

Oliver hung it up outside, but I had to rehang it a little higher off the ground. Then, we went back inside to watch for the birds! They never came...


I'm still waiting to do a toddler rainy day project with Jo! We've had some snow, but no rain yet. I was really hoping to get it done in April, which I know is when everyone else seems to have rain in the US. Poor Michigan, Wisconsin, and Illinois; they're really getting more than their share! Brookfield Zoo closed for the 3rd time in its history because they were completely flooded. Anyway, if you don't see a rainy day project from us until July, then you know why!

Friday, April 12, 2013

Jumping in Indoor Puddles


I was so excited for rain today! I had a rainy day activity planned for the kids. This morning, I checked online and confirmed the forecast: rain starting at 2pm and continuing all afternoon.

I put Oliver and Jo down for nap time/quiet time at 11am, and I gathered up supplies for my planned activity. Then, I poured myself a mug of coffee, sat down on the computer, and went back to weather.com to confirm the rain would still start on schedule.

Nope.

The updated forecast calls for an hour or two of rain starting at 6pm. Six! I am disappoint.

So, I changed our fun plan for the day. It's not exactly an activity for young toddlers, but it looked promising for Oliver and preschool-aged kids. I got the idea from a pin from Melissa & Doug on Pinterest. The pin, which you can view here, shows some little girls jumping on construction paper puddles indoors. There's no information about that activity that I can find, but it looked simple enough to figure out.

I taped some paper "puddles" to the floor and waited for Oliver and Jo to get up for the afternoon.


The puddles fascinated Oliver. I showed him how to jump from puddle to puddle. He started jumping and bouncing and counting puddles.


This is a solid rainy day activity for preschool kids, even though it wasn't exactly a rainy day. Keep this activity in mind the next time you're stuck inside all day. It's a good way to burn some energy indoors!

Friday, April 5, 2013

Birdseed Biscuits


Spring has sprung in Denver, and we need some activities to get us out of the house!

At the grocery store today, I passed by a display of bird seed. Years ago, when I was pregnant with Oliver, I flipped through a Parenting magazine at my OB-GYN's office. I saw an article on how to make a cute, little, heart-shaped birdseed biscuit. I tore it out and saved it in my recipe box. When I started on Pinterest over a year ago, I went through a bunch of things I'd saved, pinned them, and then tossed out the random articles and how-to's that I'd saved. Let Pinterest save them for me! So, anyway, I found the birdseed biscuit online and pinned it here. When I saw the birdseed at the grocery store, it reminded me of the project. I decided Oliver is finally old enough! I picked up a 7-pound, reclosable bag of wild bird feed for $6. Warning to parents of kids with severe allergies: the bag of bird feed I picked up said it contains peanuts.


When we got home, I asked Oliver if he wanted to help me make some food for the birds. You guys, he got so excited!

Here's what you need to make your own bird seed biscuits:

*Bird seed (approximately 1 cup)
*Flour (approximately 2 Tablespoons)
*Water (as needed, but approximately 2-4 Tablespoons)
*Cookie Cutter (Or use a cup to cut out circles)
*A straw
*Ribbon or string

Here's how we made our biscuits:

I handed Oliver a 1/4 cup measuring cup and asked him to pour 5 scoops of the bird feed into a bowl. Not all of his scoops were full scoops, so we probably ended up with about a cup of bird seed in the mixing bowl. I asked him to add one small scoop of flour. He filled up the same measuring cup about halfway with flour and dumped it in, so we had about 2 Tablespoons of flour to our mix. This isn't an exact science, so go with it! I filled a small pitcher with just a splash of water. Oliver poured it in and mixed everything together. It looked a little dry, so I got a bit more water. The water and flour basically make a paste to hold the birdseed together.


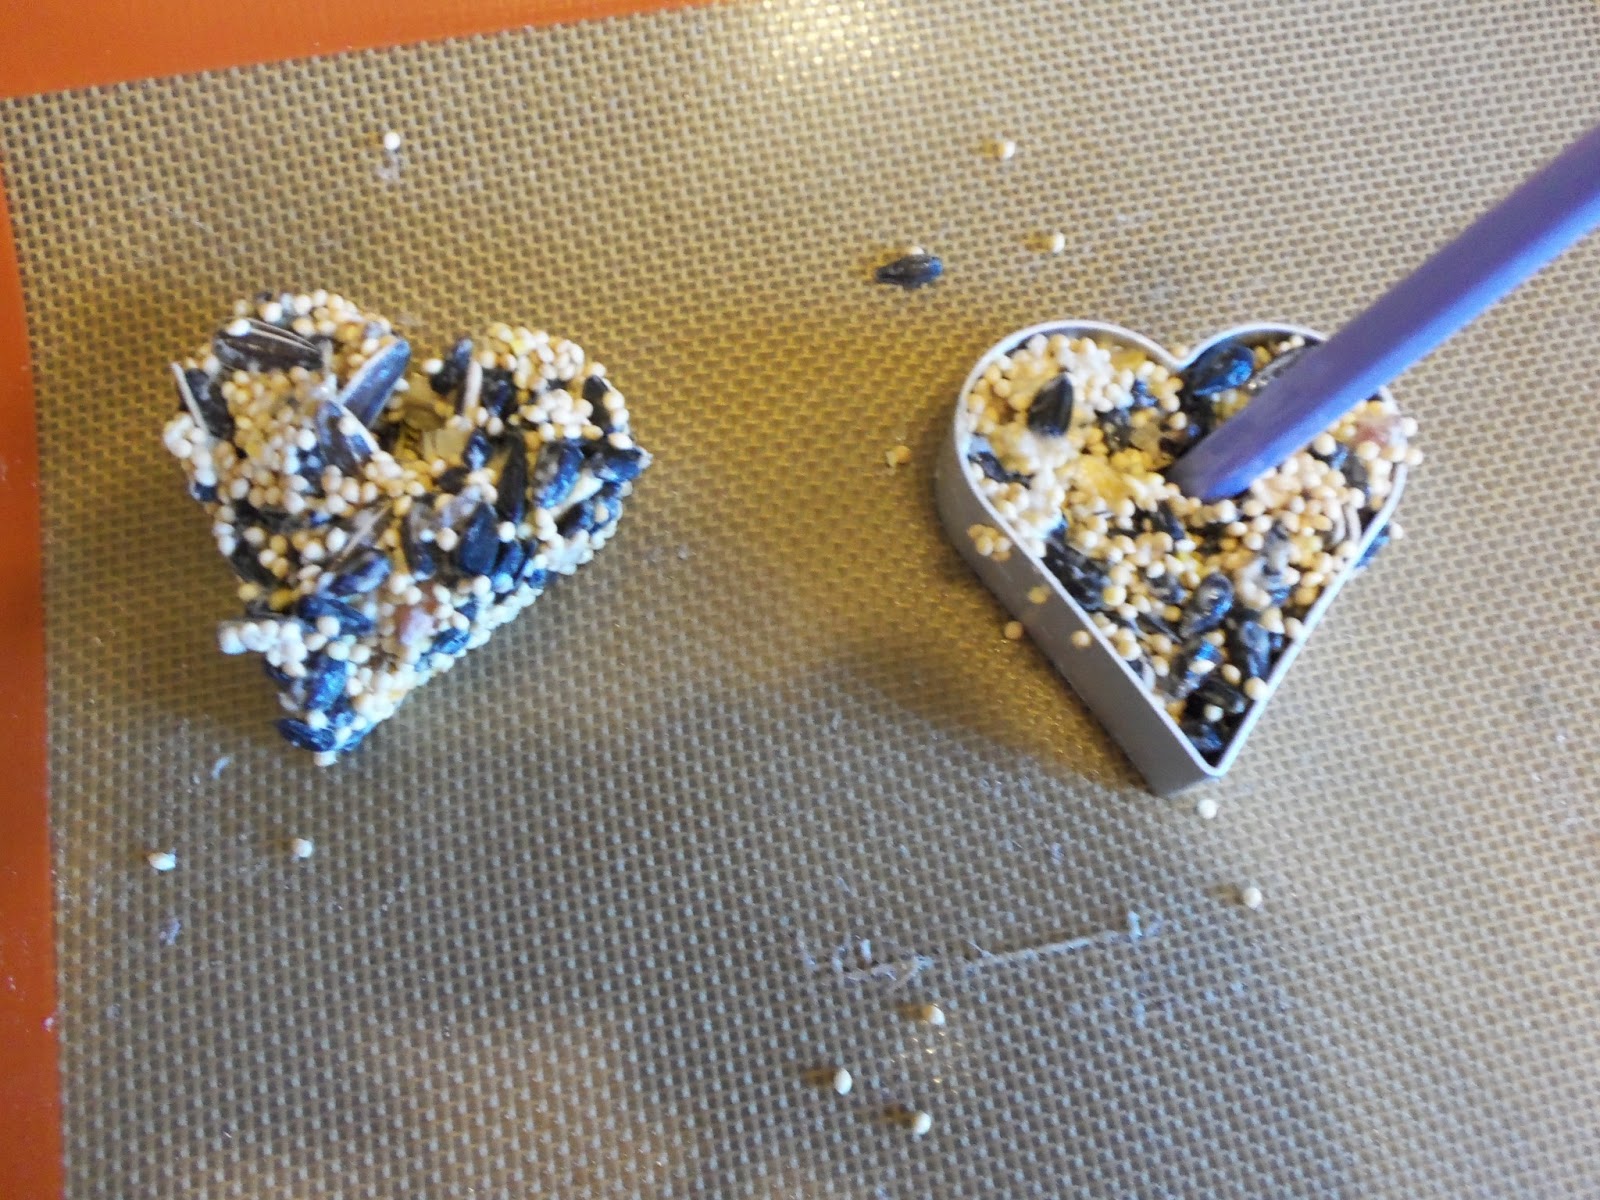
While he mixed, I preheated the oven to 170 degrees F. I sprayed my cookie cutter with Pam. I lined a baking sheet with a silicone liner I have, but you can just put foil or parchment paper on your baking sheet. When Oliver was done mixing, I pressed the mixture into the cookie cutter. I poked a hole with a straw-like instrument I had on hand. Make sure the hole goes all the way through to the bottom of the biscuit, so you can string a ribbon through when they're done baking. The directions I read said to leave the straw in while it bakes, but I actually pulled mine out. It wasn't a problem for us. I gently lifted the cookie cutter away from the biscuit and then got to work on the rest. We got 6 small biscuits out of our mixture. I popped the biscuits in the oven for an hour for them to dry and set.


As they were baking, I put Jo to bed for nap time. As I tucked Oliver in for his quiet time, he looked up at me and said, "OK, so after quiet time, we can go outside and give the birds the food." He is so excited! That made me really happy. The biscuits finished up as they rested, so I finished the project by threading ribbon through the hole in each biscuit, and I tied it with a bow.

As soon as Jo was up, Oliver announced, "OK! We get to go outside and give the birds their food!" He hung each biscuit from the tree. Then, we sat on the porch and blew bubbles, watching for the birds to come.


The birds didn't come. When we ran out of bubbles, I told Oliver we were probably scaring the birds away. So, we went inside, and he watched from the back door.


Finally, a little critter came and ate two of the biscuits. No, it wasn't a bird. It was a squirrel! I captured this photo of the guilty party: