Showing posts with label upcycle. Show all posts

Saturday, September 14, 2013

Autumn Oak Leaves Pixie Hat - Made from Grandma's Sweaters

A couple of months ago, I spotted some cute pixie hats on Pinterest. I pinned this autumn oak leaves hat, which links to an Etsy sewing pattern that costs $6. The pattern is for two sizes: 9-18 months and 18-36 months.

The pattern doesn't really explain how much fabric you need. I went to Jo-Ann and ordered blindly! I got 1.5 yards of cotton fabric for the lining of the hat, and I ended up using about half of that for three hats. I ordered the smallest amount I could (1/8 yard) of felt for each of the three colors of felt I used. The fabric came to $8, and I had a lot left over. The most expensive item was the embroidery thread I bought for $8. I only got one color instead of two because it was expensive! I used that to stitch on the leaves and acorn. Finally, she lists "wool" as an item needed for the braids on the hat. I wasn't sure what I was supposed to get, so I just ended up using some straw-colored yarn I had. The main part of the hat was made from upcycled sweaters, so I ended up spending $16 on materials for 3 hats and $6 on the pattern.

A small hat for Hazel:
                                                                                             

A small hat for Paisley:

My mother-in-law, Colleen, gave me a few wool sweaters of hers, one that was her mom's when Colleen was a baby, and one that was her mother-in-law's. We worked hard to try to get the sweaters to felt. We put them in her laundry sink and added boiling water. We mashed them with a wooden spoon, and then we ran them through her dryer a couple times. They didn't felt! I tried at my parents' house because they have an older washer and dryer. She'd heard those work better for felting. It seemed to do the trick for some of the sweaters! Three of them felted, but two did not. I was able to get one hat from each of the three felted sweaters. Two of them shrunk so small that I could just barely get a small hat from each. One stayed large enough to get the larger size hat made for Jo. Oliver and Joanna have a new baby cousin, Paisley, so we decided she should get the small hat made from Great Grandma Jackie's sweater. I sent the other to my cousin for her little girl.

Here's Joanna in her autumn oak leaves pixie hat:

I think the hats are so stinking cute! I am not much of a seamstress at all, so I think anyone who has worked with a sewing pattern before would be able to make this hat. I hat a tough time with the first one, figuring out how to flip it and where to stitch in the braided pulls. After that, the others were easy!

Monday, April 29, 2013

Meatless Monday: Homemade Vegetable Broth

I few months ago, I decided to try to make my own vegetable broth. I looked up a few how-tos online. It seemed simple enough, and it was! I can honestly say homemade broth is a lot tastier than the boxed stuff. While broth isn't very expensive, it still saves money to make your own, and you can feel good about using your scraps. I've made my own broth about half a dozen times this winter. Here's what you do:

First, keep a large piece of tupperware in your freezer. I have a one-gallon size. Whenever you chop or peel vegetables, throw your scraps into it. You can add onion peels, celery leaves, whatever! I've even added some freezer-burned peas and canned corn leftover from corn bread. If any of my vegetables start to get a little old in the fidge, I'll just roughly chop them and add them to my collection in the freezer. I've even added some canned tomato paste (I always have some leftover when recipes call for 1 Tbsp of tomato paste or whatever). Here is a picture of one of mine before making it into broth:

Once my tupperware is full (this might take a month), I put everything into a large pot and fill it with water, like so:

I bring it to a full boil, and then I reduce the heat and let it simmer for about 3-4 hours. At that time, I add some salt and garlic powder for extra flavor.

When that's done, I pour the liquid into a bowl through a strainer. All those vegetable pieces get discarded, but at least they got one more use before hitting the landfill (they'd also be great for composting, if you either do your own composting or live in a city where they collect compost for you).

Here's my broth! If I'm going to use it within the next couple days, I just pop it in the fridge. If I'm not sure when I'm going to use it, I put it in the freezer until I need it.

All of the dishes I make with broth (like penne primavera) taste so much better with the homemade stuff. Plus (maybe it's just me), I get satisfaction out of making things myself. This takes very little effort, but it does take some time.

Friday, August 24, 2012

Knitting Needle Container


A fellow knitter on an internet forum told me to use a Pringles can to hold my knitting needles.  When I asked her if it was tall enough, she assured me it was.  I continued this project under that assumption, but, alas, the Pringles can was *not* tall enough.

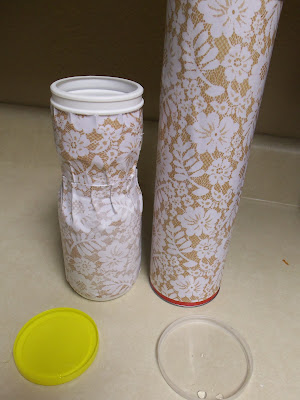
I used an empty Gerber Puffs container to hold my double pointed needles.  It worked great!  

The containers before the project:

See! I checked the sizing on the container for my double-pointed needles. Whey didn't I check the sizing of the Pringles can for my regular knitting needles? Good grief!

For this project, you need an empty container, tall enough for your needles.

You also need some scrapbook paper, ribbon, and glue. I used Modge Podge to attach the scrapbooking paper, and I used a hot glue gun to attach the ribbon.  Once, on Pinterest, I saw that you could make your own Modge Podge glue by mixing one part Elmer's glue with one part water, but I haven't tried that myself.

My supply list.  Somehow, a package of candy ended up in my shopping basket:

I cut the scrapbook paper to the height of the containers.  If you're going to trim the edges with ribbon, then your cuts just need to be approximate.  My Gerber Puffs container is cinched in the middle.  In order to fit the paper to the container, I used two pieces of paper, and I had them meet in the middle.

I brushed Modge Podge all over the container, and I pressed my scrapbook paper to the container. I used my fingers to create pleats where the container curved in.  Then, I brushed a coat of Modge Podge on top of the whole thing.  Modge Podge dries clear.


I trimmed my containers in ribbon using my hot glue gun.  It was very simple!  I created a little bow for one of the containers.

I put a dab of hot glue in one part of the bow.  Once it cooled, I poked my yarn needle into it, creating the perfect holder for my yarn needle!


I'm so bummed that the Pringles can wasn't tall enough to hold my knitting needles, but the Gerber Puffs container is *perfect* for all of my double pointed needles and yarn needle. I can now keep my needles on the side table for easy access when I'm knitting without having them scattered all over the place and unsightly.

I'm determined to do this project again with a container tall enough for my standard knitting needles. I browsed the aisles of my grocery store, and nothing jumped out at me. I have a feeling I'll have better luck at Costco. I'll be sure to update this post when I find a container that works for those!

Wednesday, July 25, 2012

100 (Attempted) Ways to Entertain a Young Toddler, Day 76: Corn Cob Paint Roller

Earlier this week, I shared some natural teething remedies that I've picked up in my few years as a mommy.  One of those remedies involved a corn cob (click here to read more about that and other teething tips).  My husband actually removed the corn bits from all three of our cobs, "just in case" I needed more than one for my blog.  I didn't.  Or so I thought.

I stared for a while at the leftover cobs on our counter top.  What could I use them for?  A creative idea hit me: an empty corn cob + corn holders = a paint roller.  

Set up an area that you feel comfortable with your kids making a mess.  Take an empty, scraped corn cob and stick two corn holders on the sides to make a paint roller.  If you don't have corn holders, they're not really necessary, but they do help keep your kid's hands relatively clean.  Put a few sheets of plain white paper on the work area.  You can tape them down to keep them from sliding.  Squirt some washable, non-toxic paints on a long sheet of wax paper (or parchment paper or whatever you have in the house).  

Show your child how to roll his/her "paint roller" into the paint.  Encourage your kid to roll it on the white sheets of paper.  


Oliver enjoys figuring out how new things work.  To him, the paint roller was a puzzle.  He dipped it in the paint and stuck his face close to the paper to watch the paint transfer from the roller to paper.


If you use primary colors (yellow, red, and blue), then it's possible they'll end up mixing on the paper and will make new colors. If your child is a little older, you can take that opportunity to teach that red and yellow mix to make orange. Yellow and blue mix to make green, and red and blue mix to make purple. The colors they make--orange, green, and purple--are secondary colors.  If your child is younger, simply point out which colors they are using as they use them to teach the names of colors. Also, if your child is younger, you might also find that he (or she) enjoys the feel of the paint. Young toddlers love to explore different textures! If you don't mind a mess, let your child feel the paint. Be careful not to let him get it in his eyes or shove it in his mouth. Even though it's non-toxic, it's better to be safe than sorry. For kids that enjoy shoving everything into their mouths, you can try yogurt finger painting instead.

Oliver loved using the roller, but, in the end, he wasn't able to resist the temptation of using his fingers to spread the paint around.  Let's just say I ended up with quite the mess, but nothing a little soap and water couldn't clean!


Corn Cob Paint Roller earns an B+.  It's creative and fun.  Because it's new and unique, it engages kids. It's also a very affordable activity.  Corn is currently still in season and is quite cheap.  In my area, it's priced at 20 cents an ear and falling!  However, the activity is also messy, involves both prep and clean-up, and requires a number of materials (paints, corn, etc).

Do any of you upcycle your corn cobs? What do you use them for? My husband told me they make great kindling for fires. I read online that Native Americans used to use them for toilet paper. My friend also told me you can spread a bit of peanut butter on them and roll them in bird seed to create a bird feeder. My son and I might tackle the bird feeder project some weekend soon. I'll be sure to update how it works for us!

Monday, December 6, 2010

Deck the Halls

Although we are wasteful just like (almost) all families, Andrew and I do our best to use what we have and to waste as little as possible. This week, we've been having fun with clementines. I bought a big box of them just before Thanksgiving because they were on sale and I had a coupon. Oliver loves them, and so do we. Still, it's hard for a family of three to eat a five pound box of clementines before they go bad!

One of the things we did this weekend was make a natural air freshener. I grabbed the leftover cloves that I'd bought (on sale!) at Safeway for the cider for Oliver's birthday party. Then, I jammed those in one of the clementines and set it in our bathroom. Now, it smells like oranges and cloves!

I love the smell, and it seems festive for the holidays. It's natural and not overpowering (I hate sprays!). In fact, I doubt it would work in a larger room (our bathroom is one of those closet bathrooms). I hope you enjoy this little tip!