A few weeks ago, Jo farted. Oliver laughed, and then he said to me, "Oliver gets to say play food processor, Mom gets to sing, and Jo gets to fart."
Weird and funny, but what's weirder is that he's said that exact phrase about half a dozen times since then! I asked Andrew if he'd taught him to say that, but he hadn't.
So, now, every time Jo farts, Oliver explains to us that he gets to play the food processor, I get to sing, and Jo gets to fart.
Friday, November 30, 2012
Wednesday, November 28, 2012
Easy Toddler Lunches
For a long time, I wouldn't make Oliver a lot of "kid" foods. I didn't want him having artificial colors and getting a taste for high-sodium junk foods. Oliver was so picky. He wouldn't eat anything! I don't think he gained a pound from about 16 months old (when he was weaned) until close to his second birthday. People say kids grow a taste for what they're given, but that was not true with Oliver. Our nutritionist at WIC would talk to me about how Oliver wasn't keeping up his weight on the weight-height chart. I kept food available to him literally all day long to try to get him to eat more, but it didn't work.
I had to learn to be less picky as his mom and started to let him eat lots of more typical kid foods, like chicken nuggets. Oliver eats a little of what Andrew and I eat, but he's happiest with simple foods like Cheerios, fish sticks, quesadillas, and peanut butter and jelly sandwiches. So, we let him have those foods for lunch. I don't serve separate dinners, though. I expect him to eat the same dinner as Andrew and me. It doesn't really work, and we have to fight to get him to eat each bite.
Anyway, Oliver doesn't eat fruit and vegetables straight up. He'd literally rather not eat. Our WIC nutritionist told me to always have fruit and vegetables on his plate so he gets used to seeing them so that maybe he'll start eating them one day. I do that, but I also hide fruits and vegetables into his meals to get him to eat them.
Here are three lunch ideas that help me get extra fruit and veggies into my kids' meals. Enjoy!
1. Use baby food in quesadillas
This tip was given to me by a friend a couple years back, when I was struggling to get Oliver to eat his vegetables. For the life of me, I can't remember which friend it was to give credit to (Lisa??).
If your kid is especially picky, use a fairly mild flavor of baby food, and one that will blend into the color of the cheese, like squash. My kids don't notice the baby food and will eat their quesadillas no matter what baby food I smear in there. I used Gerber Garden Vegetables.
All you do is smear a bit of baby food onto your tortilla:

Sprinkle cheese over the baby food:

Monday, November 26, 2012
Oliver's Cooking Show: Peanut Butter
Oliver loves cooking shows, so my husband decided to make him his very own! Learn how to make peanut butter from a toddler here:
Sunday, November 25, 2012
Another Successful Black Friday Weekend
Black Friday is my big day weekend to go around and get as many freebies and almost-freebies as I can. It's so much fun to see how much I can get for almost nothing.
Sports Authority opened at midnight on Black Friday, and they gave away a gift card to the first 80 people in line. I received a $10 gift card. They had men's T-shirts with matching athletic shorts on sale, 2 for $5. Baseballs were half off, so I got 2 for $3. I had to spend a minimum of $10 to use my $10 gift card, so I bought a candy bar. Total after taxes? 49¢
Sports Authority opened at midnight on Black Friday, and they gave away a gift card to the first 80 people in line. I received a $10 gift card. They had men's T-shirts with matching athletic shorts on sale, 2 for $5. Baseballs were half off, so I got 2 for $3. I had to spend a minimum of $10 to use my $10 gift card, so I bought a candy bar. Total after taxes? 49¢

I missed a few freebies. Toys R Us opened at 8pm on Thanksgiving (boo). They were giving away stockings stuffed with $30 worth of goodies to the first 200 people in line. By the time I got there after Thanksgiving dinner and pie, the line was 220 people long (yes, I counted...). After Sports Authority, I went to Shoe Carnival, hoping to score one of the 100 gift cards they were giving out at midnight. Alas, I was too late.
In the morning, we went to World Market. They gave us each a free ornament and a free movie ticket voucher. After World Market, we picked up our free Godiva chocolate bar. We enjoyed a free pancake breakfast at the local mall, and then we went to Costco to pick up our free cookbook (one cookbook per member). Here are my freebies:
In the morning, we went to World Market. They gave us each a free ornament and a free movie ticket voucher. After World Market, we picked up our free Godiva chocolate bar. We enjoyed a free pancake breakfast at the local mall, and then we went to Costco to pick up our free cookbook (one cookbook per member). Here are my freebies:

We also went to JC Penney to get our free buttons. Free buttons you say? Yes, free buttons. This is actually way cool. You can go to JC Penney every day between Black Friday and Christmas Eve and get two free buttons, while supplies last. Each button has a code you can enter online (maximum of two per day). One out of every four codes is a winner!
I entered a JC Penney code on Black Friday and won a $5 off of $5 purchase. They emailed me the coupon the next morning. I ran out and bought a toy for my baby nephew. Check out that receipt. FREE!
I entered a JC Penney code on Black Friday and won a $5 off of $5 purchase. They emailed me the coupon the next morning. I ran out and bought a toy for my baby nephew. Check out that receipt. FREE!

I picked up two more buttons when I checked out with my free teether. One of those buttons was a winner! I won $10 off of a $10 purchase! They sent me the coupon the next morning, and, again, I went back out to JC Penney. They had a stamp set on sale for $8. Oliver loves stamps, so I thought it would make a good Christmas gift for him. I picked up a $2 pair of socks for Jo. Total? FREE.

I picked up more buttons! I'm seriously planning on going every day. In addition to possibly winning free coupons, you could win prizes like a Kitchenaid mixer or a vacation! They're giving out one trip every day. Seriously, guys, this is like the most exciting thing to me. I love contests and freebies. Is it sad that I think this is the best thing ever?
Anyway, my next big score was for Small Business Saturday. You might have seen my post explaining how to sign up. All I did was register my American Express card for Small Business Saturday. Then, I had to spend at least $25 at a qualifying small business to earn a $25 American Express credit. I went to a neat little toy store called Timbuk Toys. Andrew and the kids played with all the demo toys they had set out while I shopped. I ended up spending $27.28 on a game for Oliver and some jingle bells for Jo. American Express is giving me a $25 statement credit, so my total for the two toys comes to $2.28!
Anyway, my next big score was for Small Business Saturday. You might have seen my post explaining how to sign up. All I did was register my American Express card for Small Business Saturday. Then, I had to spend at least $25 at a qualifying small business to earn a $25 American Express credit. I went to a neat little toy store called Timbuk Toys. Andrew and the kids played with all the demo toys they had set out while I shopped. I ended up spending $27.28 on a game for Oliver and some jingle bells for Jo. American Express is giving me a $25 statement credit, so my total for the two toys comes to $2.28!

Everything you see on this blog post, I got for a total of $2.77. The T-shirt, the athletic shorts, two baseballs, two candy bars, two movie tickets, an ornament, a cookbook. a teething toy, a stamp toy, socks, a board game, and jingle bells--under $3. Score! Have I mentioned I love Black Friday weekend?
Kids Say the Darnedest Things: Disney Edition
Oliver was watching the ballroom scene from Beauty and the Beast on Youtube. He said, "Oh! Look! It's Mom and Dad!"
I laughed and said, "What?"
He walked up to the monitor and pointed to Belle and said, "That's Mom." Then, he pointed to Beast and said, "That's Dad!"
At least I'm Belle.
I laughed and said, "What?"
He walked up to the monitor and pointed to Belle and said, "That's Mom." Then, he pointed to Beast and said, "That's Dad!"
At least I'm Belle.
Wednesday, November 21, 2012
Toddler Glitter Pinecone Ornaments

I'm feeling nostalgic. I remember hanging all of the ornaments we made at school every year onto our family Christmas tree. There were paper plate wreaths with our photos in the middle and, of course, glitter pinecones.
My cousin did this craft with her daughter last year and wrote about it on her blog here:
http://playadventures.blogspot.com/2011/12/glitter-pinecones.html
I loved the idea of shaking the pinecones in a bag of glitter (less mess!), so I decided to give it a try with Oliver.
I'm adjusting the supplies you need, based on my own experience:
Pinecones (I collected them outside with Oliver)
Plastic bags with seal closures, or tupperware with lids that snap securely
Children's glue or Mod Podge
Paint Brushes
Glitter
We purchased a pack of glitter at the dollar store. It came with five small containers like these:
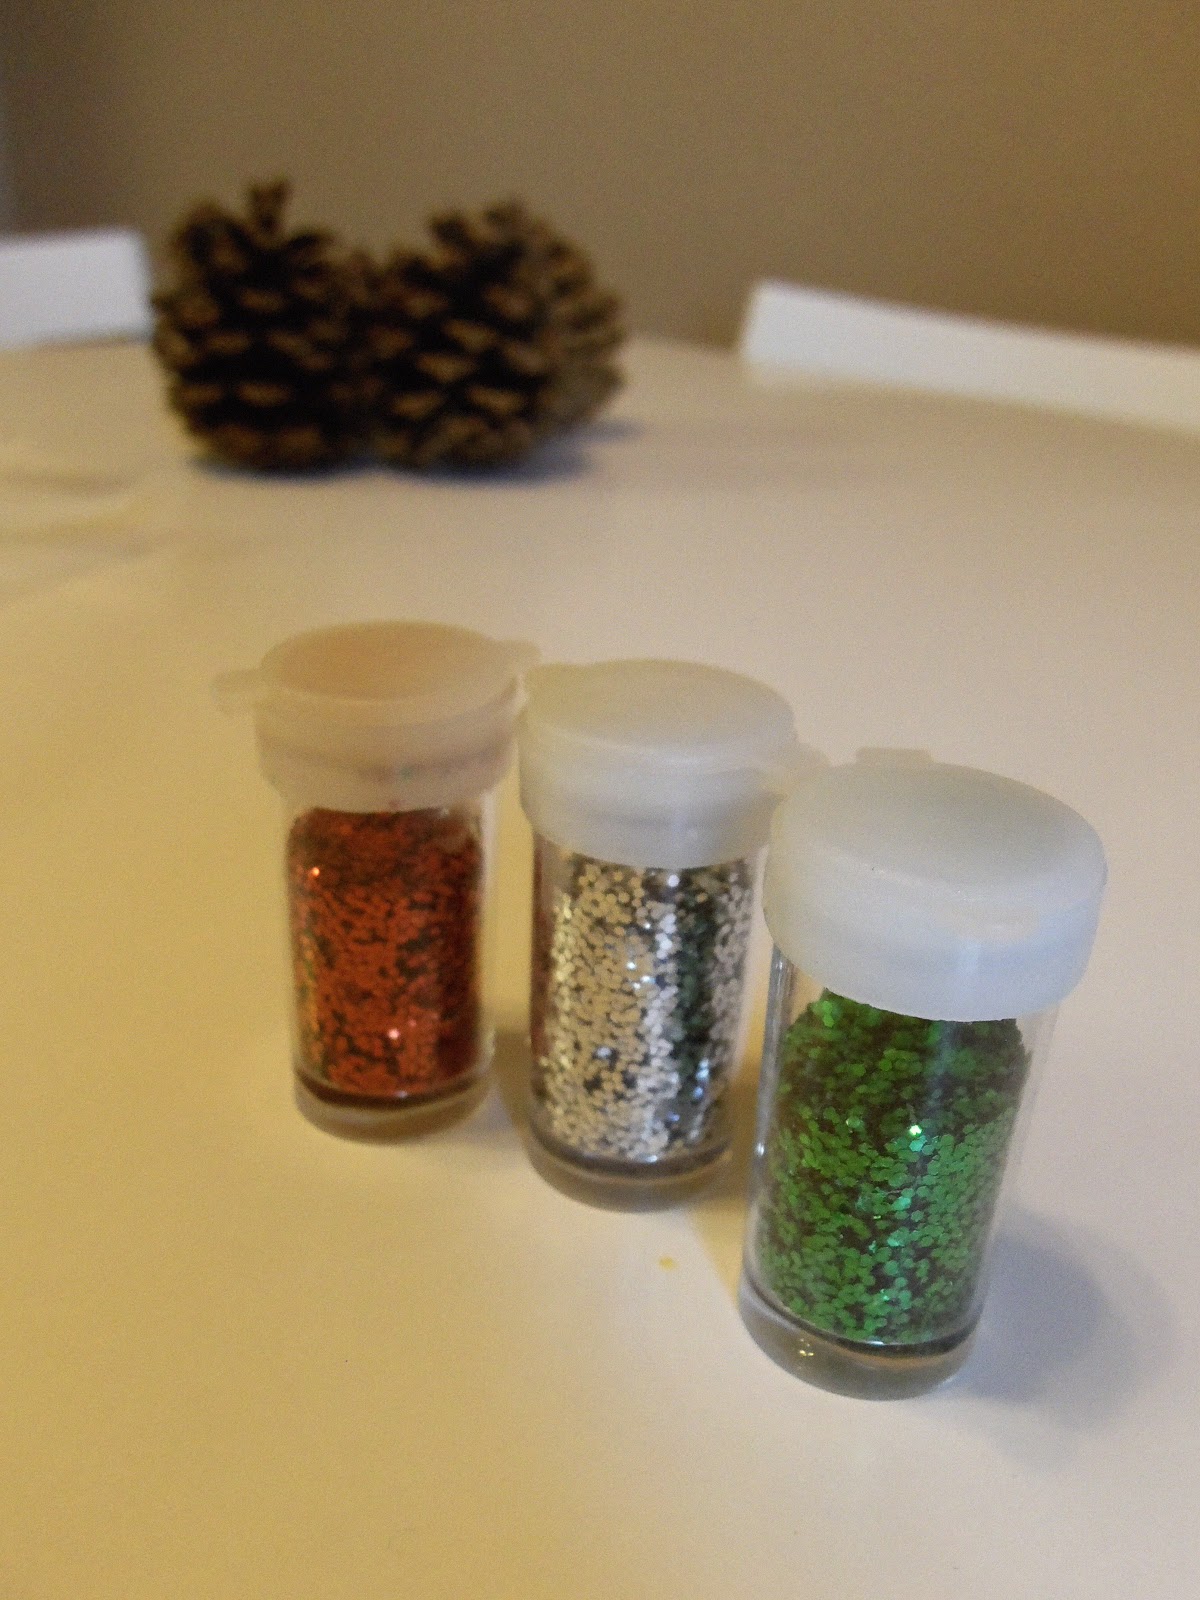
As it turns out, one container would coat just a single pinecone! So, with the pack of five, we were able to make five pinecones.
Here's what you do to set up:
1. Pour your glitter into a plastic bag or tupperware.

2. Pour your glue or into bowls. At first, I mixed them with paint, like my cousin suggested. I wasn't very pleased with the results. The red glue looked pink when coated in silver glitter, and the white barely showed through. It just wasn't worth getting paint and mixing it in (in my opinion). So, save yourself that step and just pour your glue into a bowl.

3. Place some newspaper, wax paper, or paper towels on your table to protect the area from spilled glue and glitter. Then, put your kid to work!
Here's Oliver painting his pinecones:


Oliver was able to do most of the painting himself! When he was done, I used the brush to push any large globs of glue around.
We worked one at a time so the glue wouldn't dry. When he was finished with a pinecone, I placed it in our plastic baggy and sealed it. Oliver shook the dickens out of it!


I even took a video because, yeah, I take photos of videos of everything.
Here are the glitter pinecones! OK, so working clockwise, the pinecone on the far left was painted with white glue and shaken in a bag of green glitter. The next pinecone was painted in white glue and shaken in red glitter. The next pinecone was painted in red glue and shaken in silver glitter. The next pinecone was painted in plain glue (no paint) and shaken in silver glitter. The final pinecone was painted in white glue and shaken in a mixture of red glitter and cinnamon (to make it smell Christmas-y).

I used my hot glue gun to attach yarn to hang our pinecones as ornaments. That step is optional. You can display your pinecones scattered on the mantel or in a glass bowl on your dinner table.

I plan on getting some holiday gift tags to attach to the yarn so I can write Oliver's name and the year on them. We'll give one to each set of grandparents as a gift.
Here are our finished ornaments hanging from the tree:

Oliver loves them! He goes up to the tree and points out these and the cinnamon ornaments we made last week. He says, "Oh! There are the cookies! They smell good. There are the pinecones!" So, it's safe to say this project was a hit!
Tuesday, November 20, 2012
Christmas Tip: Free Photo Calendar
I just got an email from Shutterfly. You can get a free photo calendar by using the code: CALENDAR2013 at check out. The offer ends on Friday. You'll have to pay shipping and handling, but talk about an affordable and nice gift for grandparents, aunts, and uncles!
Also, LivingSocial still has the deal going on for photo books from Picaboo. For $10, you get a 20 page, hardcover photo book. Click here to find that deal.
Enjoy!
Also, LivingSocial still has the deal going on for photo books from Picaboo. For $10, you get a 20 page, hardcover photo book. Click here to find that deal.
Enjoy!
The Rice Paddy Navy
My aunt is a published author! Well, to be fair, she's had numerous articles and pieces published before, but this is her first book. The Rice Paddy Navy: US Soldiers Undercover in China is on sale today. I've been eagerly awaiting its debut!
Her father was deployed to China during World War II. I'm told he had endless stories about his experiences there, and that's how my aunt became interested in the US forces in China.
Here's the book description from my aunt:
An American naval officer, Commander Milton Miles, and a Chinese spymaster, General Dai Li, teamed up in a quest to uproot the Japanese from China in World War II. Initially ordered to gather weather information and intelligence to aid the U.S. Navy’s Pacific fleet, Miles joined Dai to form the Sino-American Cooperative Organization. They built a network of military training camps, transforming Chinese peasants, pirates, and police officers into guerrilla soldiers and saboteurs.
My father, Chief Ship Fitter Charles L. Kush, was among those deployed to China as an instructor. He joined his students in the field to “set off explosives and run like hell.”
The Rice Paddy Navy features some well-known characters like “Wild Bill” Donovan, founder of the OSS, “Vinegar Joe” Stilwell who carved out the Burma Road, Claire Chennault, father of the Flying Tigers, and Generalissimo Chiang Kai-shek. But the real heroes of the story are young navy men and ordinary Chinese from all walks of life. It is a story of adventure, friendship, political rivalry, and tragedy.
I'm so excited about her work, and I'm excited to tell my readers about it, too. So, please, if there's a history buff in your family or circle of friends, or someone you know who is a total bibliophile, send them this book! It would make a nice Christmas gift (hint, hint!). If you can't find it at your local bookstore, it's for sale here on amazon.com. There's also a Kindle edition!
Sunday, November 18, 2012
Christmas Tip: Small Business Saturday
If you have an American Express card, you can cross a person off of your Christmas list for nearly free! It's called Small Business Saturday, and it's awesome. It helps us as shoppers and helps small businesses, too!
The official rules can be found here: https://www.americanexpress.com/us/small-business/Shop-Small/offerterms, but the basic gist of it is this:
1. Starting at midnight MST this morning (when this entry posts) through November 24 (or while entries last), sign up for Small Business Saturday here with your American Express card.
2. On Saturday, November 24, spend at least $25 in a single transaction at qualified small business that accepts American Express cards. You have to pay with your American Express, obviously. To find a store that qualifies, go to shopsmall.com and click on the tab near the top that says "Find Out Where to Shop." You can enter in your zip code or city, and they will give you a list of qualified businesses near you. When I enter in mine, I get 20 pages of businesses. You can also search by business name. I searched for a toy shop nearby, but there are also restaurants, cleaners, chocolate shops, and more. Even the Monkey Bizness down south qualifies!
3. In 8 weeks, American Express will give you a $25 statement credit on your qualified purchase. If you return your items, they'll take the credit back. So, no cheating!
Last year, I went to a spice shop in Old Littleton that I'd been meaning to check out, and I spent about $28 for some vanilla baking sugar for me and a nice spice gift set for my sister-in-law. After the statement credit, those purchases were nearly free! Enjoy your (almost) freebie!
Saturday, November 17, 2012
From Pinterest: Cave of Lights

I stumbled upon this idea on Pinterest about an hour ago. It comes from a blog called Play at Home Mom, and you can find the original idea and post here.
We had a big box leftover from a car seat, and I've been letting the kids play with it. It hasn't been a huge hit, but Oliver sometimes likes to pretend it's a garage door. In fact, I drew a number panel on the side for him to pretend to enter codes to open and close the doors.
Well, when I found the "Cave of Lights" idea, I was so excited that I went straight to the living room and started poking holes in the box for Christmas lights. We have two strands of LED lights, and I used one of those since they don't get hot. I didn't want to have to worry about burns or fires.
Here's my work in progress. The whole thing took about 15 minutes to put together:

Here's the finished product from above:

And here's how the cave looks from inside:

Oliver was so stoked!

He shut himself inside his cave. You can see the little key pad I quickly scribbled onto his "garage door" with a Sharpie:

After a few minutes, Oliver ran upstairs to grab a pillow. He laid like this and talked about the colors for a while. He also kept telling me it's "just like Grandma's!" I have no idea what he's talking about. As far as I know, there are no cave of lights at either of his grandparents' house! Maybe he was talking about the garage lights.


I emailed my husband with these photos and told him I felt like the mom of the year. Oliver loves this! Jo isn't so sure. She likes watching her brother from the outside, but she screamed in panic when I tried to put her in the box. Apparently, that's not OK.
For those of you with older toddlers and pre-schoolers, I think this idea is so clever and cute. Keep this in mind over the holiday season if you get any toys or packages in large boxes. For those of you who celebrate Christmas, t also might be cute to set this up on Christmas Eve night for your kids to discover in the morning! Thanks, Play at Home Mom!
Wednesday, November 14, 2012
Cinnamon Ornaments

Apparently, cinnamon ornaments are a thing. Did you know this? I never heard of them until this year! I guess you bake some cinnamon ornaments, and they leave a warm, cinnamon scent in your home all season long. No kidding! A friend mentioned them to me, so I went online and perused cinnamon ornament recipes.
Most of the recipes call for glue. I settled on the simplest recipe I found by McCormick: just applesauce and cinnamon. You can find that recipe right here. I worried it wouldn't hold as well without glue, but ours worked perfectly.
I combined the 3/4 cup of applesauce with the entire 4 ounce container of cinnamon. I mixed it with a spoon first to get the cinnamon moist, and then Oliver used the Kitchenaid mixer (he loves that thing) to get it mixed well. We rolled it out between two pieces of wax paper.

Oliver helped me use a cookie cutter to cut out shapes. I made a hole for the ribbon before removing the cookie cutter so the hole wouldn't warp the shape of the ornament. Because I worried the dough was fragile, I transferred each ornament to the baking sheet before removing the cookie cutter.

We got 9 ornaments out of a batch. I baked them at 200 degrees for two and a half hours. After the first hour and a half, I flipped them to make sure they dried evenly. The house smelled incredible as they baked! I threaded them with some ribbon and hung some over the back door and some on the tree.


Oliver loves any excuse to use the mixer. These were fun! I think they'll be an annual tradition in our household. We left them as is this year, but, next year, if Oliver is more crafty, we'll decorate the ornaments with glitter glue. Martha Stewart's website has some beautiful cinnamon ornaments decorated as birds. You can find them at this link. Hers are definitely too intricate for my family this year, but maybe we'll give that a try in another decade or so!
Sunday, November 11, 2012
100 (Attempted) Ways to Entertain a Young Toddler, Day 86: Egg Shells

Months ago, I found an activity on Pinterest from a blog called Play, Create, Explore that looked promising. You can find the original post here. The mom on that blog washed and dried a bunch of egg shells and put them in a bowl for her son to play with. I pinned the activity to save for a day when I was using lots of eggs, and then I forgot about it.
Fast forward to Friday night. I found a breakfast recipe for an asparagus and mushroom strata that appealed to me because you prepare it the night before, and, in the morning, you just pop it in the oven (that pin can be found right here). We were having company on Saturday morning. I thought being able to make the meal the night before would save me from having to get up early, cook, and then clean up the kitchen. Anyway, it called for eight eggs. I was stacking the cracked eggshells in an empty egg carton, trying to decide if there was anything I could do with them, and I remembered the pin.
I washed the eggs, and then I spritzed them with some anti-bacterial spray. I left them overnight to dry. Normally, I try to let my kids get dirty and exposed to the environment, but salmonella isn't something I wanted to expose Joanna to. So, I made sure they were clean and sanitized.

In the morning, I put some egg shells in a shallow bowl for both Jo and Oliver. They were both very curious about the eggs and picked them up and examined them.


It didn't take Oliver long to figure out that he could use the palms of his hands to smash the eggs. I was a little worried the shells would be sharp enough to cut his hands, but that never happened.

Oliver really got a kick out of smashing the egg shells with his palms. He was disappointed when he finished smashing all of his eggs. It took all of two minutes, and when they were smashed, he was done.

Joanna, on the other hand, kept playing! I kept an eye on her to make sure she didn't try to eat shells. She enjoyed picking off little pieces of shells. Eventually, she started to smash them, too.

Smash!

And then she enjoyed making them rain:

Andrew and I both had fun watch the kids smash eggs. I like seeing the kids explore new things and think. The activity was fun for Oliver, but it was definitely more age appropriate for Jo. She had an absolute blast with those egg shells. They weren't too messy to clean up. I just had to give the kitchen a quick sweep.
This is an activity I'll definitely remember to do again, whenever I make something that uses a lot of eggs. Next time, I'll give the kids the potato masher like the mother did on her blog. I give this activity an A!
And, in case you're wondering how that strata came out, it was delicious. It smelled insanely good, and my mouth watered the whole time it was in the oven. It came out bubbling like a lasagna. The recipe is definitely a keeper! Both Pinterest pins were a win. Yay!


Friday, November 9, 2012
$10 Photo Book Deal
LivingSocial has a deal going on right now. For $10, you get a 20 page, hardcover photo book from Picaboo. I've never used Picaboo before, but the designs look promising. I just purchased this deal and plan on using it for the travel photos I'll have from our upcoming trip to Scotland (remember when we won airfare?).
You can find the $10 deal here. I think a photo book would be a great (and now affordable!) gift idea for grandparents. You can also use it to create a book for your kids (you can see what I made for Oliver on Shutterfly here for ideas). Enjoy!
You can find the $10 deal here. I think a photo book would be a great (and now affordable!) gift idea for grandparents. You can also use it to create a book for your kids (you can see what I made for Oliver on Shutterfly here for ideas). Enjoy!
Thursday, November 8, 2012
Happy First Birthday, Jo!


So, somehow, an entire year has passed since Jo's birth. I don't know how where the time has gone, but I suddenly find myself surrounded by not one but two mischievous kids that keep me on my toes, worn out, and laughing.
Joanna is such a sweet little girl. She's (almost) always smiling and loves to talk and babble to us. She lights up when she sees Oliver or when Dad comes home from work. She plays jokes. She grabs people's shoes and puts them on her hands, and then she crawls over to us and laughs. She loves playing peek-a-boo. She likes to grab her nose and my nose at the same time as if to say, "Look, Mom, we both have noses."
She is quite the talker for being 12 months old. Jo seriously has a list of words. They are: Gesundheit, more, Mom, Dad, bye, hi, and fan. Of course, she points and claps and waves and cheers. She's very interactive.
She hasn't taken her first steps yet. She sometimes stands without holding onto things, but she doesn't do it intentionally yet. She crawls up the stairs but has no fear of falling backwards. She likes being held and carried everywhere, and I can only get her to ride in the grocery cart if I give her an object to examine and distract her first (usually a leaf).
As of last night, Jo is officially weaned. I thought I'd be so happy to have my body back--the first time in nearly four years that I'm not pregnant or breast feeding. Instead, I feel a little wistful. Jo just grew up so quickly! She drinks whole milk now and eats lots of food. Jo is not picky and loves to eat. It seems like she's eating all the time!
Sleep is going well after a bit of a rough patch a couple weeks ago. Jo goes to bed around 7pm and sleeps until nearly 6am. She sometimes wakes up once around midnight and fusses for about 20 minutes. During the day, she naps once or twice but not for very long (maybe 45 minutes). Sometimes, I can get her to sleep a little longer on my shoulder after she wakes up from her naps.
At 1 year old, here is a list of Joanna's likes and dislikes:
Likes
*Bath time
*Milk
*Watching Oliver do fun things, like run through leaves
*Leaves
*Being held
*Pointing to things and having us tell her what those things are called
*Food (her favorite is a peanut butter and jelly sandwich, diced)
*Watching me do the alphabet song in ASL
Dislikes
*Being put down
*When Oliver takes a toy away from her
*The car seat
*Diaper changes
Subscribe to:
Posts (Atom)